Using Helm
This guide provides step-by-step instructions to deploy QMigrator on a Kubernetes cluster using Helm.
Note
It assumes that your cluster (AKS, EKS, GKE, or Minikube) is already provisioned and accessible via kubectl.
Pre-Deployment Checklist
Before deploying QMigrator, verify:
- Kubernetes cluster is running and accessible
- kubectl is configured and authenticated
- Helm 3.x is installed
- StorageClass exists for shared storage (RWX)
- StorageClass exists for block storage (RWO)
- Network connectivity to source/target databases
- Sufficient cluster resources (CPU, memory, disk)
- Project information
- Latest QMigrator image list
- QMigrator registry credentials
Step 1: Prepare the Value File
- Customize the values.yaml file with the required properties.
- A minimal configuration is available in values.example.yaml, which can be further modified as needed.
Helm Value
For all available overrides, see the full Helm values reference in Helm Value.
Production Setup
For production deployments, follow the recommendations in Production Best Practices before finalizing your values file. In particular, review secret synchronization, image pull secrets, network policies, resource limits, pod security, and high availability settings.
Credentials
Set the following credentials before installation.
Project identity (required for both options):
Choose one of the credential options below.
Info
This avoids storing plaintext passwords in values.yaml.
-
Create application secret (
postgres-password,redis-password) inqmigratornamespace: -
Reference the application secret in values:
-
Create Docker registry pull secret in
qmigratornamespace: -
Reference Docker pull secret in values:
-
If Airflow is enabled, create Airflow secret:
kubectl create secret generic qmig-air-secret -n qmigrator \ --from-literal=airflow-secret-key=$(openssl rand -hex 16) \ --from-literal=airflow-fernet-key=$(openssl rand -hex 16) \ --from-literal=airflow-password='<airflow-password>' \ --from-literal=connection='postgresql://<user>:<password>@<host>:5432/<db>' -
Enable Airflow and reference the Airflow secret:
Note
If airflow.enabled: false, you can skip Airflow secret creation and airflow.secret.* settings.
Warning
Do not commit plaintext credentials to source control.
-
Set DB and Redis credentials directly in values:
-
Set image registry credentials in values:
-
If Airflow is enabled, set Airflow credentials:
Volume Reference
Option A: Static Shared + Dynamic Disk
Note
This approach uses pre-created static PVC for shared storage and dynamic provisioning for block storage.
-
Create shared storage PV and PVC before Helm deployment following Storage Guide
-
Retrieve the shared PVC name:
-
Reference the shared storage PVC in values:
-
Identify available block storage classes:
-
Configure dynamic block storage class in values:
values.yamldb: persistentVolume: storageClass: "disk-csi" # (1)! size: "5Gi" msg: persistentVolume: storageClass: "disk-csi" size: "5Gi"- Your block storage class name.
Option B: All Static Provisioning
Note
This approach uses pre-created PVCs for all storage types. Useful for environments with strict storage policies.
-
Create all Shared PV and PVC resources before Helm deployment following Storage Guide and Block Storage
-
Retrieve all PVC names:
-
Reference all existing claims in values:
Option C: All Dynamic Provisioning
Note
This approach lets Kubernetes automatically create all PVCs. Requires appropriate storage classes that support both ReadWriteMany and ReadWriteOnce access modes.
Warning
Ensure your cluster has a storage class that supports ReadWriteMany for shared storage (e.g., Azure Files, AWS EFS, GCP Filestore).
-
Identify available storage classes:
-
Configure all storage with storage classes:
values.yamlshared: persistentVolume: storageClass: "azurefile-csi" # (1)! size: "5Gi" db: persistentVolume: storageClass: "managed-csi" # (2)! size: "5Gi" msg: persistentVolume: storageClass: "managed-csi" # (3)! size: "5Gi"- Shared storage class must support
ReadWriteMany. - DB storage class must support
ReadWriteOnce. - Message storage class must support
ReadWriteOnce.
- Shared storage class must support
Gateway & HTTPRoute
Note
You can skip Gateway & HTTPRoute configuration during initial deployment by leaving gateway.enabled=false and httpRoutes.enabled=false in your values file. The application will still deploy successfully without external access. Follow the post-installation later to expose QMigrator externally.
Prerequisites:
- Ensure a Gateway API controller is installed (e.g., NGINX Gateway Fabric, Contour, or Istio) see on Gateway Guide
- Verify the gateway class name available in your cluster:
- (Optional) HTTPS based Gateway would need to install certificate manager TLS Setup
Enable Gateway:
-
Set gateway configuration:
- Installed GatewayClassName from cluster
-
Configure listeners (HTTP and/or HTTPS):
TLS Annotation
The annotation tells cert-manager to issue a certificate for the gateway listeners.
- Use your cert-manager ClusterIssuer or namespace-scoped Issuer name (e.g.,
letsencryptfor Let's Encrypt).
gateway:
  annotations:
    cert-manager.io/cluster-issuer: "letsencrypt"
  listeners:  # (1)!
  - name: http
    protocol: HTTP
    port: 80
    allowedRoutes:
      namespaces:
        from: Same
  - name: https
    hostnames: ["your-domain.com"] # (3)!
    protocol: HTTPS
    port: 443
    tls:
      mode: Terminate
      certificateRefs:
      - name: qmig-tls-cert  # (2)!
    allowedRoutes:
      namespaces:
        from: Same
- Gateway listeners configured for both HTTP and HTTPS.
- Certificate name managed by cert-manager (e.g.,
qmig-tls-cert). - Replace with your domain name (e.g., qmigrator.example.com or use the gateway external IP).
Enable HTTPRoute:
- Configure route hostnames and listeners:
Step 2: Set Kubernetes Context
Make sure you’re connected to the correct Kubernetes cluster:
Step 3: Create a Namespace
Step 4: Helm Login and Installation
helm registry login qmigrator.azurecr.io \
    --username <registry-user> \
    --password <registry-password>
helm install qmigrator oci://qmigrator.azurecr.io/helm/qmigrator -n qmigrator -f values.example.yaml
To upgrade later:
helm upgrade qmigrator oci://qmigrator.azurecr.io/helm/qmigrator -n qmigrator -f values.example.yaml
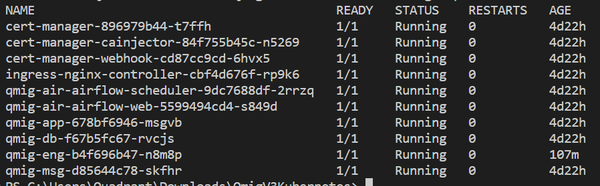
Step 5: Verify Deployment
Check if the pods are running:
Post-Installation: expose QMigrator
- To expose QMigrator externally, follow the post-installation for gateway configuration.